🍰 Oreo Red Velvet Cheesecake: A Decadent Fusion of Flavors
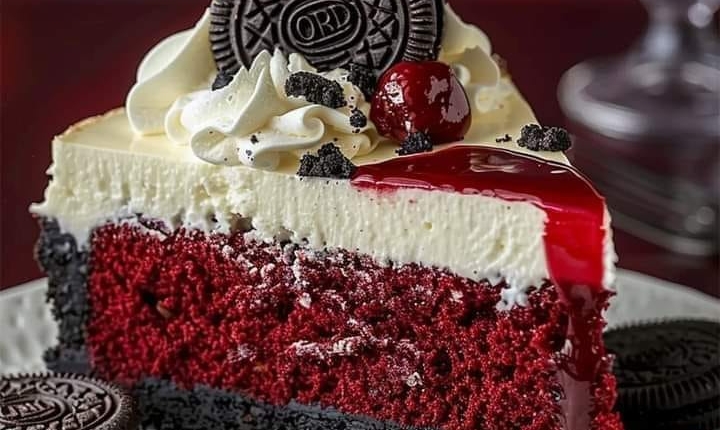
Indulge in the ultimate dessert mash-up with this Oreo Red Velvet Cheesecake! This decadent treat features a crunchy Oreo crust, a moist red velvet cake layer, and a creamy cheesecake topping, all crowned with whipped cream, cherry sauce, and Oreo garnishes. Perfect for celebrations or a luxurious treat at home, this dessert is as stunning as it is delicious.
Ingredients
Oreo Crust:
- 24 Oreo cookies (with filling)
- 1/4 cup melted butter
Red Velvet Cake Layer:
- 1 cup all-purpose flour
- 1/2 cup granulated sugar
- 1/4 cup unsweetened cocoa powder
- 1/2 teaspoon baking soda
- 1/4 teaspoon salt
- 1/2 cup buttermilk, at room temperature
- 1/2 cup vegetable oil
- 1 large egg, at room temperature
- 1 teaspoon white vinegar
- 1 teaspoon vanilla extract
- Red food coloring
Cheesecake Layer:
- 16 oz cream cheese, softened
- 1/2 cup granulated sugar
- 2 large eggs, at room temperature
- 1/2 cup sour cream
- 1/2 cup heavy cream
- 1 teaspoon vanilla extract
Topping:
- Whipped cream
- Cherry sauce or cherry preserves
- Extra Oreos for garnish
Instructions
1. Make the Oreo Crust:
- Preheat the oven to 350°F (175°C).
- Crush Oreos into fine crumbs and mix with melted butter until combined.
- Press the mixture into the bottom of a 9-inch springform pan. Bake for 10 minutes and let cool.
2. Prepare the Red Velvet Cake Layer:
- In a large bowl, whisk together the flour, sugar, cocoa powder, baking soda, and salt.
- In another bowl, whisk together the buttermilk, oil, egg, vinegar, vanilla, and red food coloring until well combined.
- Gradually mix the wet ingredients into the dry ingredients until smooth.
- Pour the batter over the cooled Oreo crust and bake for 20-25 minutes, or until a toothpick inserted in the center comes out clean. Let cool completely.
3. Prepare the Cheesecake Layer:
- Reduce the oven temperature to 325°F (165°C).
- In a large mixing bowl, beat cream cheese and sugar until smooth.
- Add eggs one at a time, mixing well after each addition.
- Mix in sour cream, heavy cream, and vanilla until fully combined.
- Pour the cheesecake batter over the cooled red velvet cake layer.
4. Bake the Cheesecake:
- Place the springform pan in a larger baking dish and pour hot water into the larger dish until it reaches halfway up the sides of the springform pan (water bath).
- Bake for 50-60 minutes, or until the center is set but slightly jiggly.
- Turn off the oven, crack the door open, and let the cheesecake cool in the oven for 1 hour. Remove from the oven and refrigerate for at least 4 hours or overnight.
5. Decorate and Serve:
- Top the chilled cheesecake with whipped cream, cherry sauce, and garnish with an Oreo and extra crumbs.
- Slice and enjoy this rich and indulgent dessert!
Tips for Success:
- Ensure smooth cheesecake layers: Beat the cream cheese until completely smooth before adding other ingredients.
- Vibrant red velvet: Use gel food coloring for a bold and vibrant red hue without altering the batter consistency.
- Perfect water bath: Wrap the springform pan tightly with aluminum foil to prevent water from seeping in.
Frequently Asked Questions:
Q: Can I skip the water bath?
A: While it’s optional, the water bath helps prevent cracks and ensures an even, creamy texture in the cheesecake.
Q: Can I use store-bought red velvet cake mix?
A: Yes! Prepare the cake mix according to the package instructions and proceed with the rest of the recipe.
Q: How long does the cheesecake last?
A: Store in an airtight container in the refrigerator for up to 5 days.
Common Mistakes and Solutions:
- Mistake 1: Crust falling apart.
Solution: Press the Oreo crumbs firmly into the pan to ensure a stable base. - Mistake 2: Cheesecake cracks.
Solution: Use a water bath and avoid overbaking the cheesecake. - Mistake 3: Uneven layers.
Solution: Let each layer cool completely before adding the next to maintain clean, distinct layers.
Don’t miss interesting posts on Famousbio

