🎄 No-Bake Peppermint Cheesecake: A Festive Delight ❄️
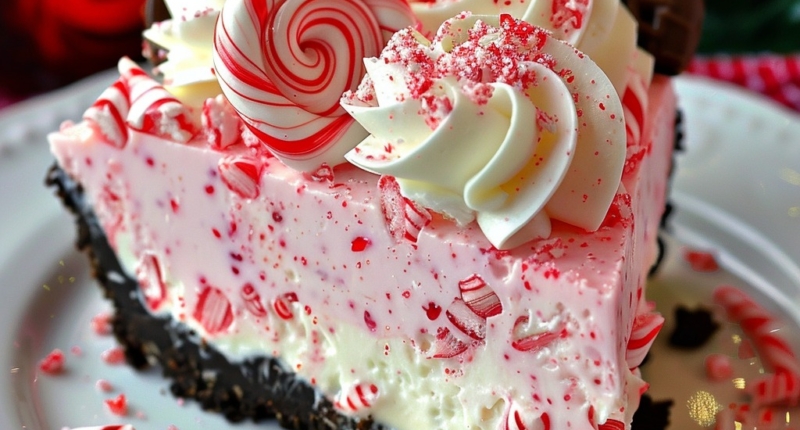
Bring a touch of holiday magic to your table with this No-Bake Peppermint Cheesecake! With a crunchy chocolate cookie crust, creamy peppermint-flavored filling, and a garnish of crushed candy canes, this dessert is as festive as it is delicious. Best of all, there’s no oven required—making it perfect for stress-free holiday gatherings. Let’s whip up this wintery treat!
Ingredients
For the Crust
- 2 cups crushed chocolate cookies (about 20 cookies): A rich, chocolatey base.
- 6 tbsp unsalted butter, melted: Binds the cookie crumbs into a firm crust.
For the Cheesecake Filling
- 16 oz cream cheese, softened: Creates the creamy, tangy cheesecake texture.
- 1 cup powdered sugar: Sweetens without the grainy texture.
- 1 tsp peppermint extract: Gives the cheesecake its signature minty flavor.
- 1 tsp vanilla extract: Adds warmth and balances the peppermint.
- 1 ½ cups heavy whipping cream, cold: Makes the filling light and fluffy.
- ½ cup crushed peppermint candies or candy canes: Adds festive crunch and flavor.
For Garnish
- Whipped cream (optional): Adds a fluffy, decorative touch.
- Extra peppermint candies (optional): Swirled candies or crushed bits for festive flair.
How to Make No-Bake Peppermint Cheesecake
Step 1: Prepare the Crust
- Mix crushed chocolate cookies and melted butter in a medium bowl until the mixture resembles wet sand.
- Press the mixture firmly into the bottom of a 9-inch springform pan.
- Chill the crust in the refrigerator while preparing the filling.
Step 2: Make the Cheesecake Filling
- In a large bowl, beat softened cream cheese and powdered sugar until smooth and creamy.
- Add peppermint extract and vanilla extract, and mix until well combined.
Step 3: Whip the Cream
- In a separate bowl, whip cold heavy whipping cream until stiff peaks form.
Step 4: Combine and Assemble

- Gently fold the whipped cream into the cream cheese mixture until smooth.
- Fold in crushed peppermint candies, ensuring even distribution.
- Spoon the filling onto the chilled crust and spread evenly. Smooth the top with a spatula.
Step 5: Chill
Cover the cheesecake and refrigerate for at least 4 hours, or overnight, until firm.
Step 6: Garnish and Serve
- Top with dollops of whipped cream and extra crushed peppermint candies.
- Slice, serve, and enjoy this festive delight!
Pro Tips for Success
- Soften Cream Cheese: Ensure cream cheese is softened to avoid lumps in the filling.
- Cold Whipping Cream: Keep the whipping cream cold for the best results.
- Quick Crush: Use a food processor or a rolling pin to crush cookies and candies easily.
- Overnight Chill: For the best texture, chill the cheesecake overnight.
- Prevent Candy Cane Melting: Add crushed candies just before folding them into the filling to maintain their crunch.
Frequently Asked Questions
Q1: Can I use a different crust?
Yes! A graham cracker crust or vanilla wafer crust would also work beautifully.
Q2: Can I freeze this cheesecake?
Absolutely! Wrap the cheesecake tightly in plastic wrap and freeze for up to a month. Thaw in the fridge before serving.
Q3: What if I don’t have peppermint extract?
You can use mint extract sparingly, but the flavor will be slightly different.
Q4: How do I prevent cracks in the cheesecake?
No need to worry! Since this is a no-bake recipe, cracks aren’t an issue.
Q5: Can I use store-bought whipped cream for the topping?
Yes, store-bought whipped cream works, but freshly whipped cream provides a lighter, fluffier finish.
Q6: How long will this cheesecake last?
Stored in the refrigerator, this cheesecake will stay fresh for up to 3 days.
Common Mistakes and Solutions
- Runny Filling: Ensure the whipped cream is whipped to stiff peaks and fold it gently to maintain structure.
- Melting Candy Pieces: Add crushed candies just before folding and serve soon after chilling.
- Loose Crust: Press the crust firmly into the pan and chill it thoroughly before adding the filling.
Enjoy this creamy, minty, and festive dessert—it’s guaranteed to become a holiday favorite! 🎄🍰❄️
Don’t miss interesting posts on Famousbio

