Homemade No-Bake Twix Cheesecake: A Decadent Dessert
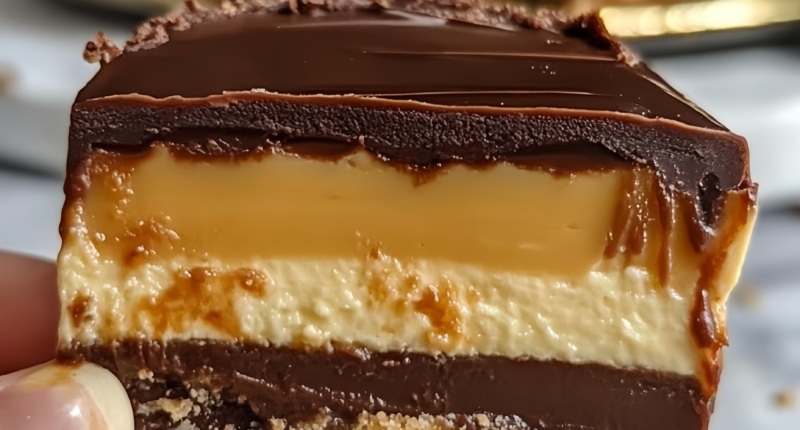
Who’s ready for a slice of pure indulgence? This Homemade No-Bake Twix Cheesecake is a dreamy dessert loaded with layers of chocolate, caramel, and creamy cheesecake that will remind you of everyone’s favorite Twix bar. Perfect for chocolate and caramel lovers, this no-bake recipe combines rich and refreshing flavors without requiring an oven. Let’s dive in and create this show-stopping dessert that’s sure to be a crowd-pleaser!
Ingredients:
For the Crust:
- 2 cups crushed graham crackers
(Provides that classic crunch. Crush using a food processor or a rolling pin in a plastic bag.) - 1/2 cup melted butter
(Adds a rich, buttery flavor to hold the crust together.)
For the Chocolate Layer:

- 1 cup semi-sweet chocolate chips
(Melts into a luscious base over the crust.) - 1/4 cup heavy cream
(Creates a smooth, glossy chocolate layer.)
For the Cheesecake Layer:
- 16 oz cream cheese (softened)
(The creamy star of the cheesecake filling!) - 1/2 cup powdered sugar
(Balances the tanginess of the cream cheese.) - 1 tsp vanilla extract
(Enhances the overall flavor of the cheesecake.)
For the Caramel Layer:
- 3/4 cup caramel sauce
(Rich and gooey for that iconic Twix flavor.)
For the Chocolate Topping:
- 1 cup milk chocolate chips
(A sweet finishing touch reminiscent of a Twix bar.) - 1/4 cup heavy cream
(Ensures a smooth, spreadable topping.)
Directions:
Step 1: Make the Crust
Combine the crushed graham crackers and melted butter in a bowl until the crumbs are well-coated. Press this mixture firmly into the bottom of a 9-inch springform pan to create an even crust. Chill in the fridge while preparing the next layer.
Step 2: Prepare the Chocolate Layer
Melt the semi-sweet chocolate chips with 1/4 cup of heavy cream, stirring until smooth. Pour over the chilled crust and spread evenly. Return the pan to the fridge to set.
Step 3: Make the Cheesecake Layer
In a mixing bowl, beat the softened cream cheese, powdered sugar, and vanilla extract until smooth and creamy. Spread this filling over the chocolate layer, smoothing the top. Chill for 20 minutes.
Step 4: Add the Caramel Layer
Pour the caramel sauce over the cheesecake layer, spreading it evenly. Chill again while preparing the final topping.
Step 5: Prepare the Chocolate Topping
Melt the milk chocolate chips with the remaining 1/4 cup of heavy cream until smooth. Spread over the caramel layer for a glossy finish.
Step 6: Chill and Serve
Chill the entire cheesecake for at least 4 hours or overnight for best results. Slice and serve your luxurious Twix-inspired cheesecake!
Tips for Success:
- Enhance the Flavor: Add a pinch of sea salt to the caramel layer for a sweet-and-salty twist.
- Customize the Crust: Swap graham crackers for chocolate wafer cookies or digestive biscuits for a unique flavor.
- Perfect Slices: Dip your knife in hot water and wipe it clean before cutting for smooth, clean layers.
Frequently Asked Questions (FAQs):
1. Can I use store-bought caramel?
Yes, store-bought caramel works perfectly for this recipe, but homemade caramel adds an extra special touch.
2. How far in advance can I make this cheesecake?
You can prepare this cheesecake up to two days in advance. It tastes even better the next day!
3. Can I make this dairy-free?
Yes, substitute cream cheese and heavy cream with dairy-free alternatives. Note that the texture and flavor may vary slightly.
4. How do I store leftovers?
Keep leftovers covered in the refrigerator for up to 5 days.
5. Can I freeze this cheesecake?
Absolutely! Wrap tightly in plastic wrap and foil, then freeze for up to a month. Thaw in the fridge before serving.
Common Mistakes to Avoid:
1. Overmixing the Cheesecake Filling: Overmixing can make the filling too dense. Mix just until smooth and creamy.
2. Rushing the Chill Time: Allow the layers to chill fully for the best structure and flavor.
3. Uneven Layers: Use a spatula to spread each layer evenly to maintain that professional look.
4. Skipping the Springform Pan: A springform pan ensures easy removal and beautifully clean edges.
Don’t miss interesting posts on Famousbio

