🍒 Cherry Pie Bars 🍰

Introduction
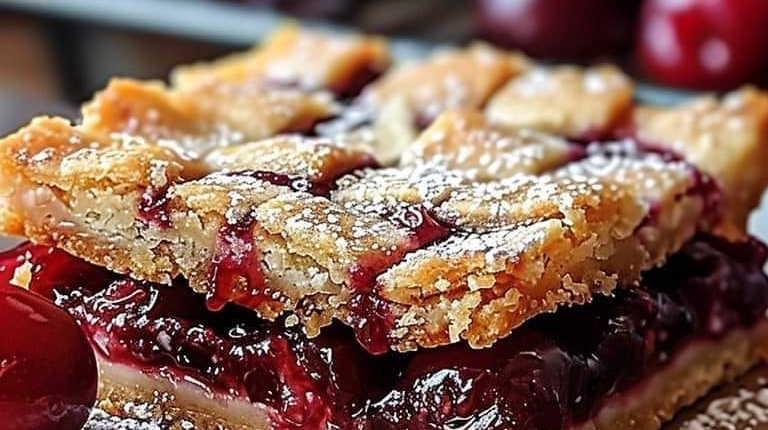
These Cherry Pie Bars combine the classic flavors of a cherry pie with the simplicity of bar cookies. With a buttery crumb crust and sweet cherry filling, these bars are perfect for potlucks, picnics, or a quick dessert fix. They’re easy to make, delicious to eat, and look beautiful on any dessert table!
Ingredients
- 🍚 2½ cups all-purpose flour
- 🍬 1¼ cups granulated sugar
- ⏳ 1 teaspoon baking powder
- 🧐 ½ teaspoon salt
- 🥛 1 cup unsalted butter, cold and cubed
- 🥚 1 large egg
- 🍯 1 teaspoon vanilla extract
- 🍒 1 can (21 oz) cherry pie filling
Instructions
1. Preheat the Oven:
- Preheat your oven to 350°F (175°C).
- Grease a 9×13-inch baking dish or line it with parchment paper for easy removal.
2. Prepare the Crumb Mixture:
- In a large mixing bowl, whisk together the flour, sugar, baking powder, and salt.
- Add the cold, cubed butter to the dry ingredients.
- Use a pastry cutter, fork, or your hands to mix until the mixture resembles coarse crumbs.
- Reserve 1 cup of the crumb mixture for the topping.
3. Make the Dough Base:
- To the remaining crumb mixture, add the egg and vanilla extract.
- Mix until the dough begins to come together. It should be slightly sticky but crumbly.
- Press the dough evenly into the bottom of the prepared baking dish to form the crust.
4. Add the Cherry Filling:
- Spread the cherry pie filling evenly over the crust using a spatula or spoon.
5. Top with Reserved Crumbs:
- Sprinkle the reserved crumb mixture evenly over the cherry filling to create a crumbly topping.
6. Bake:
- Bake for 45-50 minutes, or until the top is golden brown and the cherry filling is bubbly.
- Remove the pan from the oven and allow the bars to cool completely in the pan.
7. Slice and Serve:
- Once cooled, cut the bars into squares or rectangles.
- Optionally, dust with powdered sugar or serve with a scoop of vanilla ice cream for extra indulgence!
Tips for Perfect Cherry Pie Bars
- Chill the Butter: Using cold butter ensures a flaky, crumbly crust and topping.
- Parchment Paper Hack: Line the baking dish with parchment paper, leaving some overhang to lift the bars out easily for clean slicing.
- Add Flavor: Enhance the cherry filling by mixing in a teaspoon of almond extract or a pinch of cinnamon.
- Make It Fruity: Substitute cherry pie filling with blueberry, apple, or raspberry filling for a twist on this recipe.
- Storage: Store the bars in an airtight container at room temperature for up to 3 days or in the refrigerator for up to 5 days.
Frequently Asked Questions (FAQs)
Q: Can I use homemade cherry pie filling? A: Yes! If you prefer homemade, simply use about 2 cups of your favorite cherry pie filling.
Q: Can I freeze cherry pie bars? A: Absolutely! Allow the bars to cool completely, wrap them tightly in plastic wrap, and freeze for up to 2 months. Thaw at room temperature before serving.
Q: Can I use salted butter instead of unsalted butter? A: Yes, but reduce the added salt in the recipe to a pinch to balance the flavors.
Q: How do I know when the bars are done? A: The top will be golden brown, and the cherry filling will bubble slightly around the edges.
Q: Can I make this recipe gluten-free? A: Yes! Substitute all-purpose flour with a 1:1 gluten-free flour blend for a gluten-free version.
Common Mistakes and Solutions
- Mistake: Crust is too crumbly.
- Solution: Ensure the butter is cold but fully mixed into the flour. Press the crust firmly into the baking dish.
- Mistake: Bars stick to the pan.
- Solution: Always grease the pan or line it with parchment paper for easy removal.
- Mistake: Overbaking the bars.
- Solution: Bake until golden, but not dark brown. Check at the 45-minute mark to avoid overbaking.
- Mistake: Uneven crumb topping.
- Solution: Sprinkle the reserved crumb mixture evenly across the cherry filling for consistent coverage.
Don’t miss interesting posts on Famousbio

